A steep hill can feel brutal, while a smooth shift makes it almost friendly. When you know your bike’s gears, you waste less energy and keep the pedals turning with a steady hum instead of a grind. You’ll learn which gears help on climbs, which ones wake up on flat roads, and how to avoid the awkward clunk that makes you look like you’re arguing with your chain. The useful part starts with one simple habit.
Key Takeaways
- Use easier gears for climbs: small front chainring with larger rear cogs; use harder gears for speed: big front ring with smaller rear cogs.
- Right shifter moves the rear derailleur for small cadence changes; left shifter moves the front derailleur for bigger gear-range jumps.
- Aim for a steady cadence around 75–90 RPM, and shift early when pedaling slows or starts feeling heavy.
- Shift while pedaling lightly, ease pressure during the shift, and change one rear cog at a time for smoother gear changes.
- Avoid extreme cross-chaining like big-big or small-small, and downshift before hills or stops to keep pedaling easy.
What Bike Gears Do

Think of bike gears as your way to bargain with the road. You change how hard each pedal stroke feels by pairing front chainrings with rear cogs. Bigger chainrings and smaller cogs make a harder gear for speed. Smaller chainrings and larger cogs make an easier gear when the street tilts up and the asphalt suddenly feels sticky.
Your RIGHT hand usually handles the rear cogs, where shifts feel like small, neat steps. Your LEFT hand moves the front chainrings, where the jump feels bigger, like changing lanes on a busy avenue. You’re trying to keep a smooth cadence, often around 75 to 90 RPM, so the bike hums instead of grinds. Just skip the awkward cross-chain combos. They add noise, wear, and that annoying chain complaint no rider enjoys much. On Maui roads, visitors should also remember bike laws like helmets, lights, and basic road rules while getting comfortable with shifting.
Why Shifting Saves Energy
When you shift at the right time, you keep your cadence smooth and steady, and your legs don’t have to grind like they’re climbing a staircase in wet sand. If you click into an easier gear before a hill, you save your muscles for the long haul instead of burning them up in one hard push. Small shifts also help you hold your rhythm, so the bike moves with less fuss and you finish the ride with more left in the tank. On rides like a Maui tour, best time of day can also affect how smooth and comfortable your effort feels.
Maintain Steady Cadence
As the road tilts up or the wind starts to press against you, a steady cadence saves more energy than grinding away in a hard gear. Aim to spin at about 75 to 90 RPM, and shift early when your cadence slips under 70.
Use the rear derailleur for small, frequent moves that keep your legs turning smoothly. Save the front derailleur for bigger changes when a climb suddenly rears up ahead. If you see a hill coming, click down one or two cogs before it bites, so you don’t wrestle a stubborn gear under load. During a front shift, ease pedal pressure for one stroke so the chain glides across cleanly. Avoid cross-chaining too, because a straighter chain runs quieter, feels smoother, and wastes less effort on rough roads. Even on a Maui bike tour, smooth shifting matters more than advanced experience, because smart gear changes help riders of different skill levels stay comfortable and in control.
Reduce Muscle Fatigue
Because an easier gear lets your legs spin instead of shove, smart shifting cuts muscle fatigue before it sneaks up on you. When you choose a smaller front chainring or a larger rear cog, you keep a smoother cadence, often around 75 to 90 RPM, and your legs stop mashing like they’re turning wet cement.
Use the rear cog for small changes and save big front chainring moves for bigger range shifts. If you need to downshift, do it early enough to keep your rhythm steady and avoid grinding out a tired, heavy stroke. During a front shift, briefly lighten pedal pressure for one stroke so the chain moves cleanly. Also skip cross-chaining. Those extreme chain angles add drag, make the bike sound grumpy, and quietly drain your legs over time. On long descents like the Haleakala Bike Tour, using the right gear can also help you stay in control and avoid unnecessary strain.
Still comparing How To Use Gears On A Bike: Quick Crash Course?
Ask for tour ideas, hotel suggestions, or a simple trip plan that combines both.
Trip Helper
Shift Before Hills
Hills reward riders who think a few seconds ahead. When you anticipate a climb, shift into an easier rear cog one or two clicks early. That keeps your cadence near 75 to 90 RPM, so you roll in smoothly instead of bogging down and stomping the pedals like you’re crushing grapes.
If the slope looks serious, use the front derailleur before your legs slow to a grind. Drop to the small chainring, then fine-tune with the rear. Ease your pedal pressure for one full turn as you shift, especially across several cogs, so the chain moves cleanly without protest. Shifting early also cuts drivetrain wear and lowers your odds of stalling halfway up. And if you stop near a hill, downshift first so your restart feels calm, light, and easy.
Practicing this timing on beginner downhill riding before a big ride can make your shifts feel more natural and controlled.
Know Your Low and High Gears

Usually, the quickest way to make sense of bike gears is to picture two extremes. Your low gear pairs the smallest front chainring with the largest rear cog. That setup feels friendly on steep climbs and from a stop, because you keep cadence high without stomping on the pedals. Your high gear does the opposite. It uses the largest front chainring and smallest rear cog for speed, sprinting, and smooth descents.
If your bike has multiple front rings, the left shifter moves the front and the right shifter fine tunes the rear. For easier pedaling, go smaller in front and larger in back. Avoid cross-chaining, since big-big and small-small make the drivetrain noisy and wear it faster. Look ahead and shift early, before your legs bog down or the road suddenly tips. On Maui, riders should also stay alert to road shoulders and traffic habits so gear changes never distract from safe positioning.
Count Your Bike Gears the Easy Way
Start with a quick head count of what’s on your bike. To count your bike and its gear speeds, multiply the front chainrings by the cassette cogs on the rear cassette. If you’ve got 2 rings up front and 11 in back, that’s 22-speed. Simple math, greasy fingers optional.
- Count the front chainrings. You might see one, two, or three.
- Count the rear cassette cogs. Modern bikes often say this number alone, like 11-speed.
- If you ride an internal-gear hub, count the built-in positions instead.
For real riding, think in ranges. The small front ring helps on climbs. The middle handles everyday roads. The big ring suits faster stretches. Then you fine-tune with the rear cassette. Some indexed shifters also show numbers, so your gear position is easy to glance at. For longer rides, comfortable shoes can make a noticeable difference in overall comfort on bike tours.
Find Your Shifters
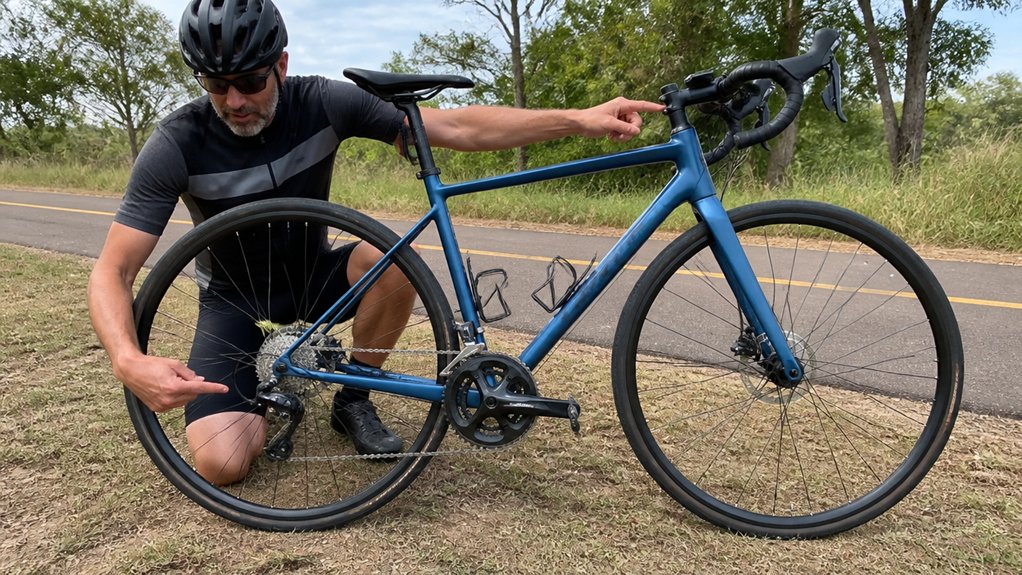
Now that you know how many gears your bike has, look for the controls that move between them. On most bikes, the left shifter works the front derailleur, and the right shifter moves the rear derailleur. That tells you which side does what before you roll away.
Your shifters may sit inside road brake levers, where you nudge a lever sideways until it clicks. On flat bars, you’ll usually see thumb triggers or a twist grip by the handlebar rubber. Check the shifter indicators too. They often show left 1 to 3 and right 1 to 7, 8, or 11. For a Maui bike tour, wear comfortable clothing so it’s easier to focus on learning your shifters and gears.
If your bike has indexed shifters, each click lands in a set position. Friction shifters feel looser, so you stop when the chain lines up neatly.
Use the Right Shifter for Small Changes
You’ll use the right shifter for the small moves that keep your ride feeling smooth, with each click usually nudging the chain one cog across the cassette. When the road tilts up or eases off, tap that shifter one gear at a time to keep your cadence steady and your bike quiet instead of crunchy. On long descents, pair smart shifting with braking tips so your hands stay more comfortable and in control. Once you get the feel for those clicks, you can adjust almost by instinct, like turning a knob until everything hums just right.
Rear Shifter Fine-Tuning
When the road tilts or the pace shifts, the right-hand shifter is your best tool for fine-tuning. It controls the rear derailleur, and each click moves the chain one step across the cassette. That gives you quick control without a big jump in effort.
- Click toward larger rear cogs when pedaling feels heavy. Your legs will notice the relief almost at once.
- Click toward smaller cogs when the road smooths out and you want more speed. Keep your cadence neat and relaxed.
- Shift while pedaling with light, steady pressure. If you mash hard, the drivetrain may grind, hesitate, or complain like a tired suitcase.
Use the rear shifter for most small changes. Save the front for bigger range moves, and avoid cross‑chaining while you fine-tune each moment. If you’re new to riding, practice these small rear shifts on gentle terrain first, since first-time riders benefit most from smooth, predictable gear changes before tackling steeper roads.
Small Terrain Adjustments
Reading the road becomes easier once you treat the right-hand shifter as your quick-adjust tool. Your rear derailleur handles small adjustments on the cassette, so you can ease or firm up pedaling without a dramatic change. If your cadence starts to sag on a short rise, click to a larger rear cog. If the road opens and you want speed, click to a smaller one.
The trick is to shift while pedaling smoothly, then lighten pressure for one full turn. That lets the chain settle cleanly with a neat little buzz instead of a clunk. Look ahead and change a gear or two before the pavement tilts or the light turns green. You’ll keep momentum and avoid cross-chaining by staying in the right rear range for your front ring on every ride. On long descents like the Haleakala downhill, these small rear-gear changes help you stay comfortable as the road gradient subtly shifts.
Shift One Gear At A Time
Now make the right-hand shifter your fine-tuning tool and use it one click at a time. The rear derailleur moves the chain one cog with each click, so shift one gear at a time to smooth your cadence. On indexed systems, those clicks match the cassette positions, which makes counting easy.
- Climbing a rise? Downshift early by one cog, then repeat if the hill keeps biting.
- When you shift uphill, ease pedal pressure for one revolution. Let the chain settle, then press hard again.
- Keep small changes in the rear before touching the front ring. That helps you avoid cross-chaining and keeps the chainline straighter.
If a missed shift leads to trouble on a tour, knowing how to handle a flat tire during a Maui bike tour can keep the ride from unraveling.
You’ll hear less grinding, feel cleaner engagement, and look oddly graceful while the road tilts and your bike stays calm beneath you.
Use the Left Shifter for Big Jumps
Although the right shifter handles the fine tuning, the left shifter is your tool for the big moves because it sends the chain across the front chainrings in one dramatic step. You use the left shifter to command the front derailleur and make big jumps in effort. Ease pedal pressure for one smooth turn first. If you’re shifting onto the bigger ring, give one brief nudge.
| Need | Front ring | Next step |
|---|---|---|
| Easier spin | Small chainring | Shift rear 1 to 3 |
| Harder push | Large chainring | Shift rear 1 to 3 |
Watch your chain line. Avoid cross‑chaining by skipping big front with biggest rear, or small front with smallest rear. After the shift clicks home, fine tune cadence with the right shifter. Your bike will sound calmer, too. Staying relaxed can also help prevent motion sickness on downhill tours.
Shift Before the Hill
Before the road tilts up, give yourself a head start and shift down early. If you anticipate climbs, you’ll keep your cadence near 75 to 90 RPM instead of mashing while the bike slows and the hill suddenly feels twice as long. On windy roads, safe handling starts with staying calm and making small, steady adjustments instead of sudden moves.
- Click one to several rear cogs easier before the slope bites. Earlier is better than later.
- For a longer rise, move the front derailleur to the smaller chainring before the steepest pitch, then fine-tune with the rear cogs.
- Near a stop on an incline, choose an easy gear so restarting feels smooth, not like pushing a loaded suitcase uphill.
You’ll hear less grinding and spare your drivetrain. Give one brief lighter stroke when using the front derailleur, then roll into the climb ready and calm.
Pedal Smoothly While You Shift
As you shift, keep your cadence steady and ease off the pedals for about one full turn so the chain can move with a quiet click instead of a harsh grind. You’ll get cleaner front and rear shifts when you soften your pedal stroke before things feel strained, especially if you stay seated and skip the heroic sprinting. With a little practice, you can feel that sweet spot where the bike changes gears smoothly and almost seems to sigh with relief. Before heading out, make sure your essential gear is packed for a Maui bike tour so you can focus on riding smoothly.
Keep Cadence Steady
Often, the secret to smooth shifting is keeping your cadence steady instead of waiting until the pedals feel heavy or wildly fast. Try to hover around 75 to 90 RPM, that sweet spot where the bike feels alive, not frantic. When cadence drops on a rise, make a small shift before your legs bog down.
- Watch the road ahead. If a climb is coming, downshift the rear cogs early, one or two at a time.
- Save the big move. Use the front chainring only if those smaller rear cogs still aren’t enough.
- Practice the rhythm. On a stand, pedal and shift so the clicks, chain noise, and crank speed start to feel familiar.
This matters on Maui bike tours, where non-cyclists often have a better experience when they shift early and keep pedaling smoothly on changing terrain.
You’re aiming for a smooth drumbeat, not a sudden stomp or cartoon spin.
Ease Pedal Pressure
That steady cadence works best when you pair it with a softer pedal stroke during the shift itself. As you ease pedal pressure for one full revolution, the chain can move without that crunchy complaint. Riders on Kula to Makawao routes often notice smoother, quieter shifts when they lighten pedal force before rolling terrain changes. To shift the front, relax the leg on the downstroke just before and during the click. For rear shifts, keep turning the pedals with light, even force.
| When | What you do | Why it helps |
|---|---|---|
| Front shift | Soften downstroke | Chain moves cleanly |
| Rear shifts | Pedal gently | Cogs index smoothly |
| One revolution | Stay light | Avoid grinding |
| Climbing | pre-shift early | Prevent bogging |
| Practice | Spin cranks by hand | Build timing |
On hills, pre-shift by downshifting one or two cogs before cadence slips. Practice on flat ground until it feels natural and quiet.
Shift Before Strain
Usually, the cleanest shift happens a moment before the hill bites back. You should anticipate hills and shift the gears as resistance first sneaks in, before your legs bog down. That means choosing a larger rear cog or a smaller front ring while your cadence still feels smooth and springy. On long descents like those found on Maui bike tours, smooth early shifting helps you stay comfortable and in control.
- Use the right shifter for small fixes. It helps you stay near a steady spin instead of grinding.
- When you shift, lighten pressure on the pedals for one stroke. The chain will hop more neatly, with less crunch and complaint.
- Save the left shifter for bigger changes. If you must shift climbing, stay seated, ease pedal force briefly, then power back up.
If the front derailleur rubs, trim it or make a tiny rear adjustment. Your bike will thank you.
Use Easy Gears for Climbing
When a hill starts to rise ahead, shift to an easier gear before it bites. You’ll keep your cadence smooth instead of grinding. Anticipate the climb and click down one or two rear gears early. Then use the left-hand shifter to drop into the small front ring. Ease pedal pressure for a moment so the front shift lands cleanly.
From there, fine-tune with your right hand until the chain sits on a largest cog or another big rear cog that feels right. Aim for about 75 to 90 RPM. If your legs slow and the bike starts to feel sticky, shift again. Keep the chainline straighter by staying in the largest two-thirds of the cassette. Avoid small front ring with tiny rear cogs. Your knees will thank you later.
On routes with sustained grades like the West Maui Loop, using easy gears early can improve both safety and enjoyment.
Use Harder Gears on Flats
On flat roads, you’ll usually shift harder when your legs start spinning faster than your target cadence and the bike feels a little too easy, almost like you’re pedaling air. Start by nudging the right-hand shifter into slightly smaller rear cogs for a cleaner, quieter change, then move to the big front ring if you need more gear for steady speed. You’ll hold pace better by using the big ring with mid-to-small rear cogs on the flats, which keeps the chainline straighter and your drivetrain happier. If you’re filming your ride, a handlebar mount can capture smooth footage of your gear changes and riding position on flat sections.
When To Shift Harder
Often, the cue to shift harder on a flat road is simple: your legs start spinning faster than your target cadence, around 75 to 90 RPM, and the bike feels a little too easy, almost like you’re pedaling air.
- If your cadence stays high for more than a few breaths, shift up smoothly. Use the right shifter first for a small change.
- If a long flat opens ahead, move to the big front chainring before speed builds, then trim with the rear cog until your rhythm feels strong and quiet.
- If a tailwind or gentle downhill sneaks in, anticipate it. Shift up gradually so the change feels clean, not clunky. Keep the chain line sensible, too. Your bike should hum, not complain. That little mechanical purr usually means you nailed it just right.
Rear Cogs For Flats
Think of the rear cogs as your fine-tuning dial for flat roads. Start in a middle cog, about 4 on an 8-speed cassette, then use the rear derailleur to move toward the smallest cogs as speed builds. That puts you in a high gear, so you can hold pace without your legs buzzing like a cheap motel fan.
Aim to keep your cadence around 75 to 90 RPM. On a flat stretch, shift one or two cogs at a time so power stays smooth and your rhythm doesn’t trip over itself. If you want steady speed, pair the rear with the big front chainring, then fine-tune from there. Just don’t cross-chain into the smallest cogs at the extreme. Shift before you overspin, and the road will feel calm, fast, and neatly under control.
Avoid Cross-Chaining
Usually, one of the easiest ways to keep your bike quiet and happy is to avoid cross-chaining. Cross‑chaining happens when you pair the biggest front chainring with the biggest rear cog, or the smallest ring with the smallest cog. That twists the chainline, adding wear and noise.
Avoid cross-chaining to keep your bike quieter, smoother, and happier, while reducing chain wear and extra drivetrain noise.
- Use the small ring with the largest 2 to 4 rear cogs for climbing.
- Use the middle ring with most cogs for everyday riding and smoother cadence.
- Use the big ring only with the smallest 2 to 3 cogs on faster roads.
If you need a big gear change, shift the rear cog first, then the front chainring. Your drivetrain will sound smoother, last longer, and feel less crunchy. Modern setups forgive mild angles, but avoid big-big and small-small whenever you can.
Trim the Front Derailleur
Even when you avoid the worst chain angles, you may still hear a faint scrape from the front derailleur as you move across the rear cogs. That whispery metal sound is chain rub, and trim is the quiet fix. Some bikes let you nudge the left shifter into a tiny extra position without making a full front shift.
Use trim when you’re in the big ring and move to larger rear cogs, or when you’re in the small ring and shift to smaller rear cogs. Ease pedal pressure for one stroke, tap the shifter or release it slightly, and let the cage slide just enough. You’ll hear the rubbing fade and the drivetrain sound smoother. If chain rub follows you across many rear cogs, skip repeated trimming and get the front derailleur adjusted professionally.
Fix Common Shifting Mistakes
When shifting goes wrong, the bike tells you fast with a grind, a clunk, or that hollow feeling of pushing hard and getting nowhere. Usually, you can fix it quickly.
- If the front derailleur grinds, don’t force it. Ease pedal pressure for one stroke, tap the left shifter, and let the chain climb cleanly. If it misses, stop pedaling, back off slightly, then retry lightly.
- Avoid cross-chaining. Big front with biggest rear, or small front with smallest rear, twists the chain at a harsh angle. You’ll hear extra noise, feel slipping, and wear parts faster.
- Use the rear shifter for small corrections and the front for big changes. Anticipate climbs by downshifting one or two cogs early, before your cadence bogs down and your legs start bargaining.
Practice Shifting With Confidence

Start in a quiet parking lot where you can hear each click and clatter without traffic in your ear. To practice shifting, pedal slow circles or lift the rear wheel and run through the rear cogs one by one. Notice the indexed clicks and how your cadence changes.
As a hill comes closer, shift early to an easier gear, one or two cogs at a time. If you need more help, use the front derailleur and move to the small ring. For clean front shifts, lighten pedal pressure for a stroke, then pedal normally once the chain lands. Avoid cross‑chaining while you learn. Match the small ring with the biggest rear cogs, the middle with mid-range cogs, and the big ring with the smallest ones. Your chain will thank you later.
Frequently Asked Questions
How Often Should I Replace a Worn Bike Chain?
You should replace a worn bike chain every 2,000–3,000 miles on roads, or 1,000–2,000 in harsh ride conditions. Check chain wear by measuring stretch; smart replacement intervals protect your drivetrain lifespan and prevent skipping.
Can I Shift Gears While Stopped at Traffic Lights?
Yes, on internal hubs you can; on derailleur bikes you usually can’t. At a red light, practice shifting etiquette: choose a starter gear before stopping for smooth gear engagement; clutch systems and cadence training help.
Why Do My Gears Click Even After Shifting?
Your gears click after shifting because you’ve likely got slight cable tension issues, imperfect shifter indexing, derailleur alignment problems, chain stretch, or freehub wear. You should clean, inspect, and adjust each part to quiet everything.
Do Electric Bikes Use Gears Differently From Regular Bikes?
Yes, you use e-bike gears similarly, but motor torque changes timing. Like merging into traffic, you ease off briefly when shifting. With pedal assist, power sensing and electronic shifting help manage gear ratio changes more smoothly.
What Should I Do if My Chain Keeps Dropping?
If your chain keeps dropping, check alignment, clean drivetrain, inspect links, tighten bolts, and adjust derailleur. You should replace worn chain or cogs, avoid cross-chaining, and ease pedal pressure while shifting so engagement stays secure.
Conclusion
Now you know how to make your gears work like a quiet backstage crew, keeping each mile smooth while you enjoy the show. Shift early, keep your cadence steady, and match easy gears to climbs and harder ones to open road. Listen for the soft click, feel the chain settle, and avoid those twisted cross-chain setups. With a little practice in a parking lot or on a gentle hill, you’ll ride farther with less fuss and more fun.